Saturday 30 June 2012

My dream came true! I got a VW Campervan!


If you read my earlier post about campervan's, you will know how desperately I wanted one. If you haven't read it yet you might want to check it out here.  

Well, guess what?

On Wednesday Chris and I became the proud owners of a VW T25 Campervan. Hurrah! I am so excited to make him beautiful inside (yes, it is a he) but I thought I would share some photos of what he looks like now so you can all see the 'Before and After'.

But first things first, I had better tell you what his name is! We debated for some while on this. Chris wanted to call him Leonardo after the Teenage Mutant Ninja Turtle with the blue headband. This didn't sound like a van name to me and reminded me of Leonardo DiCaprio, and that's just weird.  My Dad wanted me to call it Joey after a VW Beetle my Grandad once owned, and my Mum thought it should be called Bluebird because of the number plate (BRD). My work colleagues started calling it Smurfet after I had mentioned it looked rather like a Smuf. Other names were thrown in the mix: Myrtle, Jack Baur, Grace, but none really clicked... until ...

I had a brain wave in my car on the way home from work.  One of my favourite books is Great Expectations, and we sure have great expectations for this van. So what better name than that of the main character of said book 'Pip'! 

I think he looks like a Pip don't you?

Pip's interior is ok, but if you look closely he is getting shabby. I think we can do better! He's going to get a total make over.  We're going to have the units and cooker along the side where the window is to give us a bit more space. We'll probably put cupboard doors in that top cubby hole too. It's quite spacious! Not to mention nice new floor tiles, probably black and white checkered ones.
Here's the lounge/bedroom.  We're going to take that bed out and put in a 3/4 rock and roll bed instead. That way we can fit the cupboards up the side.
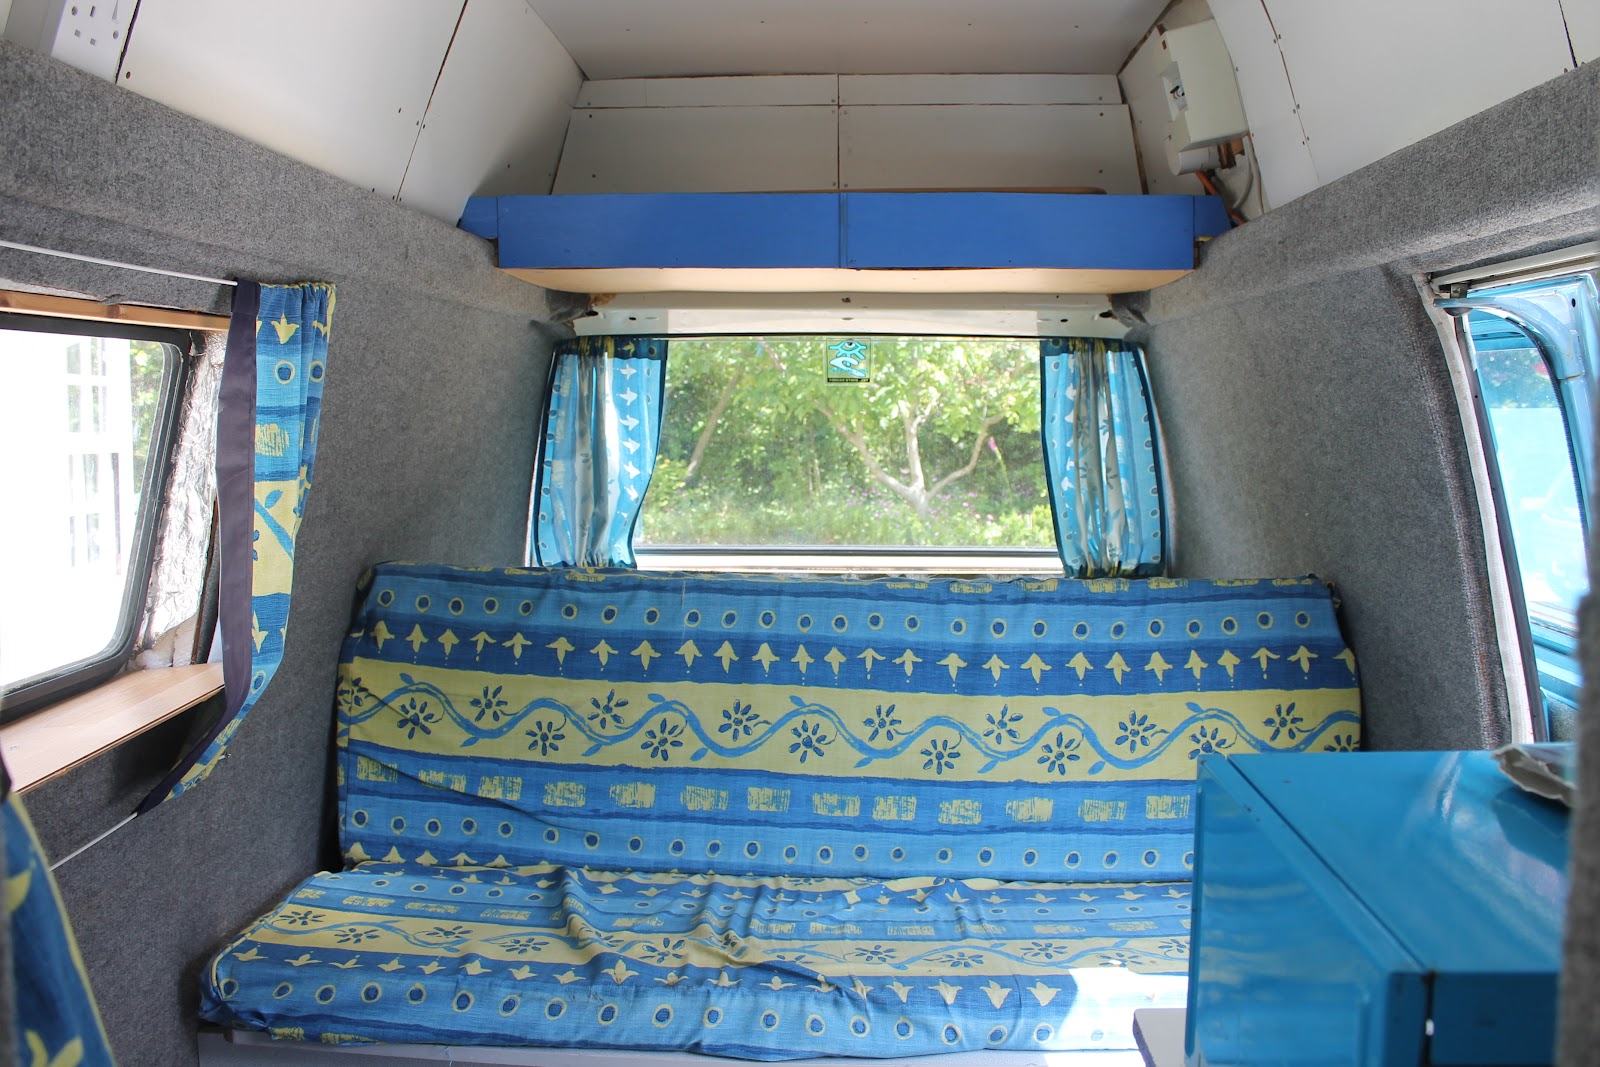
We'll have nice new curtains and seating too. I'll probably pick a dark beige/light brown fabric for this. Then we can accessorise with pretty coloured things (can you accessorise a van?)
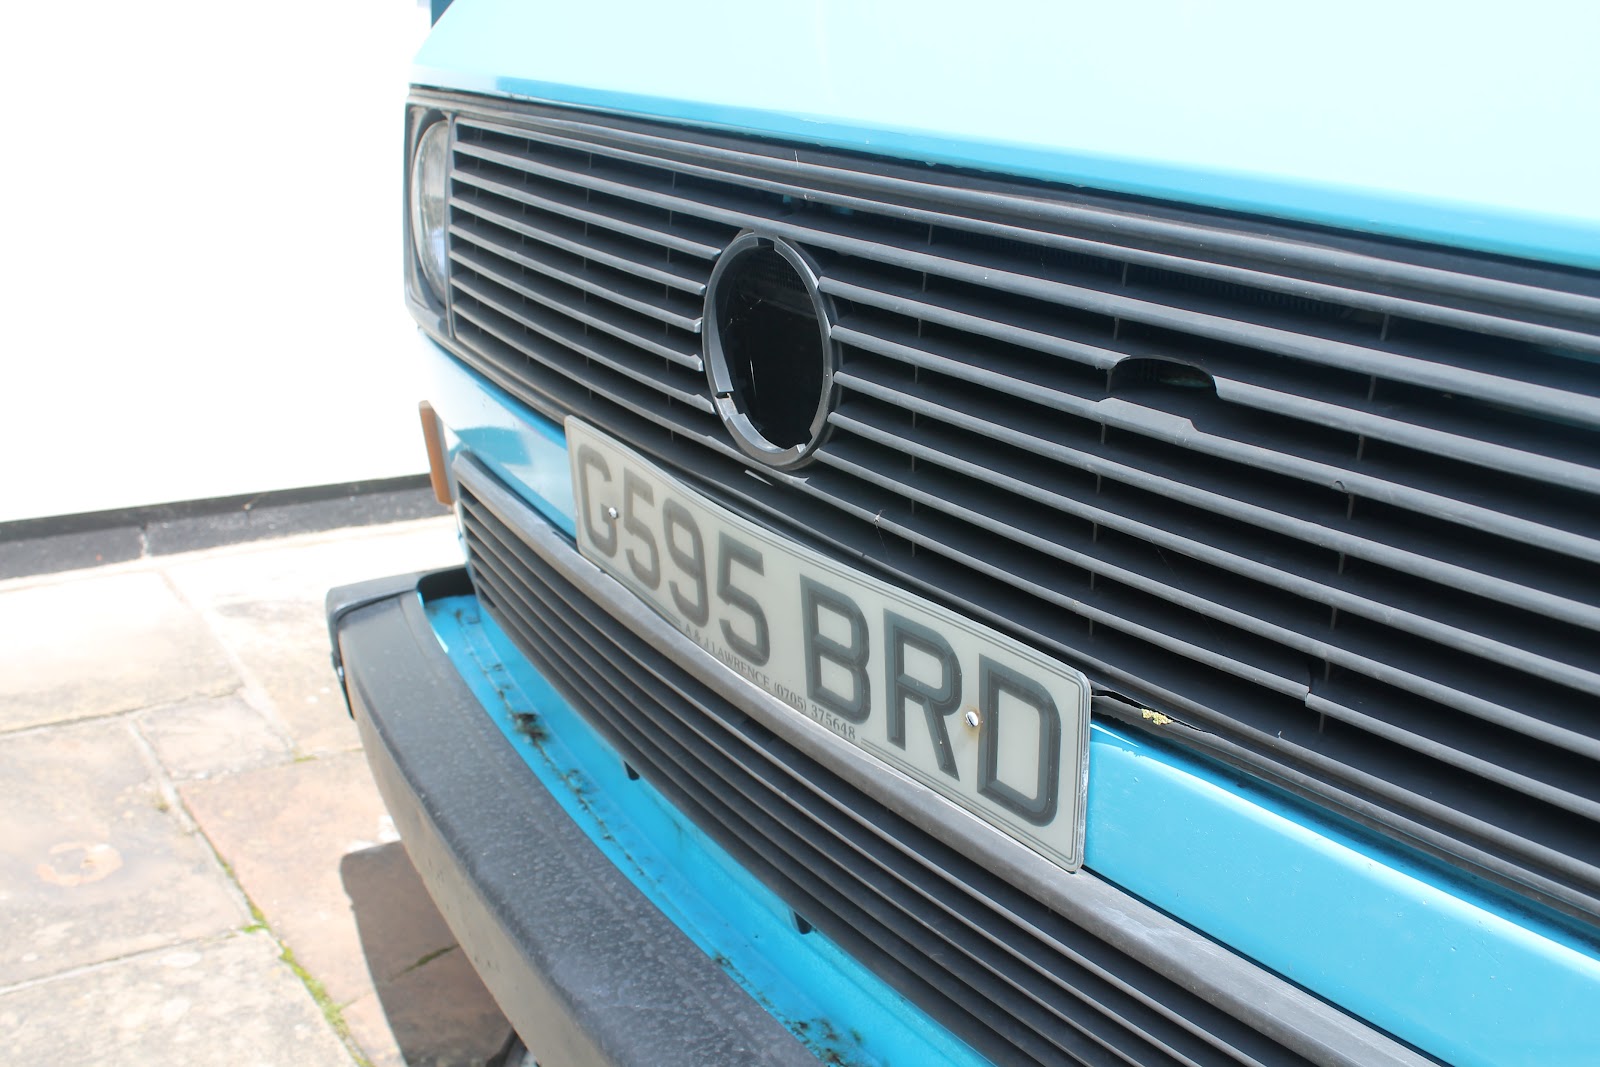
Unfortunately the VW signs are missing from the front and the back! Poor Pip, he is VWless!  I am guessing a naughty youth stole them a while back. I will have to hunt down some replacements to cover his dignity. Ebay here I come!
Here's the front. I like how there are panels behind the seats. It makes me feel like an American trucker!    Those stickers were stuck on by one of the vans previous owners, apparently he was a surfer dude! I think we will try to take those off and maybe paint the panels a pretty colour if we can.
Today we have been cleaning the van out. Here we can see all of the treasures/rubbish Chris found hiding in the van (sorry he is half naked - it was hot work apparently).
Some of the treasures included; a pack of fairtrade sugar, a peg, a hook, two speaker covers, a mint, a paintbrush, a cable tie and a cuddly toy. Oh wait... no cuddly toy :(
One actual treasure I found was in the boot in this mysterious box. "What could it be?" I hear you ask.
Only a whole flippin' box of screwy wrench things (I have no idea what these are called - you know, you tighten stuff with them!) Anyway, Chris was happy!
I love our Pip! We have already had 3 fun evenings with him, and we haven't even been away yet. 

On Wednesday I was raring to go out and drive him (That says a lot because I am not the most confident of drivers and over the past 5 years I have only driven my little KA.) Chris took us to a car park so I could have a go without putting any road-goers in danger.  It's certainly tricky to find the gears, you basically have to hit the radio if you want to get into second, and even Chris is having a bit of trouble, but once we get used to it it will be fine! At least no one will be able to steal him!

On Thursday we drove him to the beach and had dinner in him,  it was lovely!

On Friday we sat and had a drink in him and discussed our makeover plans. Then this morning we had our breakfast and tea in him. The postman looked a bit confused when he spotted us!

I think this is going to make a huge difference to our lives and make us do things we would have never dreamt of doing before. Here's to adventure!
Pip, Jus' chillin'
Laura xXx
Read More

Wednesday 27 June 2012

Awesome Nails

I just wanted to share with you all a fantastic nail design which I tried out a few weeks ago. I saw it at The Dainty Squid (if you haven't already noticed, I love this blog).  I thought I would purchase some of the nail stickers and give it a go. They look pretty awesome, I think you will agree! But, they were by no means perfect, and I did learn some important lessons for next time.

1.  I need some better quality nail varnish! - Because you can only really use one layer of varnish on the top two parts of the pattern, they really need to be good quality to get good coverage. Mine weren't which left a few imperfections.

2. It's safest to start with the lightest colour on the bottom and graduate to the darkest on the top. Luckily I got this right without thinking about it. But I'm sure if I had tried the pattern the other way around it would have looked just awful as the yellow would not have covered the pink properly, and the pink wouldn't have covered the grey. (I'm sure when you have good quality varnish this isn't such a problem)

3. With as many layers as this, you will need a hefty wad of cotton pads and copious amounts of nail varnish remover. I nearly ran out and almost had to try and rock the 'shabby chic' look.

I will definitely try this again. Although when I first put it on it was a little shocking, in the end i grew to love it.  In fact, it brightened my day just to look at them (is that sad?). I also nearly crashed my car a few times whilst in a daze admiring them - they should come with a health and safety warning!
I tried the design again a few days ago. This time I just used different shades of red/pink.  My technique has definitely improved! The lines came out much neater this time. If I get brave maybe I will do a vlog on how to get them just right.

As always, I'd love to know what you think.

Laura xXx

Read More

Monday 25 June 2012

Munchie Monday - Pink Meringues


I have just bought some new food colourings to play with, and have been trying to think of new ways of using them. Of course, meringues are ideal because the mixture is white so the food colouring really stands out. I've not made meringues before so I was interested to see if it would be something easy to do.

They look yummy, no?  Keep reading to find out how I made them

Ingredients
  • 3 egg whites
  • 175g white caster sugar
  • 1/2 tsp vanilla extract
  • Pink food colouring. I use Wilton Icing Colours Set. (These are pretty awesome and I'm having a blast making all my food funky colours)
Method

Preheat the oven to 140c. Put your egg whites in a large grease free bowl. Mix with an electric whisk until they form soft peaks. (You can use a hand whisk instead if you are feeling strong and energetic.) Gradually add the caster sugar 1 table spoon at a time, still mixing with the whisk, until all the sugar is added and you have a thick glossy mix. Then add a small amount of your food colouring (it really doesn't take much) and mix until it is all blended in. If you want a darker colour just add a little more colouring until it is right.
Line your baking tray with baking paper. You can use a small  dollop of mixture in each corner to hold it down. Now for the fun part. Using a metal spoon place 6 craggy dollops (yes, that is the technical term, the recipe says so) onto your baking tray spread evenly apart.  
Pop these in the oven for 1hr 15 mins. Once done place on a wire rack to cool.  Your meringues will still be mallowy in the centre.  If you would like them to be crisp all the way through put them in the oven for 1hr 30 mins. Then turn the oven off and leave in to slowly cool for a further 4 hours, then transfer to a wire cooling rack.

The Verdict

I am so happy with how these turned out.  I am definitely going to make them in lots of different colours now I know the recipe works.  It was super easy to do and although they took a while to cook I hardly spent any time at all actually preparing. On top of that it only takes 3 ingredients, all of which you probably already have in your kitchen cupboard! Oh, and Chris can actually eat these! (he is wheat intolerant) which is a serious bonus, it can be so tricky to find him desserts sometimes!

We ate ours with organic vanilla yoghurt and raspberries, yum yum!  If you try this recipe i'd love to know how it turns out.

You can find the original recipe I used here.

Laura xXx

Read More

Sunday 24 June 2012

Sea Glass Treasure Hunting

I did another quick whiz around the beach the other day to hunt down some pretty sea glass. Here is what I collected:

I really like the piece that looks like a bottle stopper. I wonder what it was used for. Also check out that blue rock! It isn't glass, it is literally a rock, but it's totally blue throughout! Weird.
I'm hoping to use all of my pretty sea-glass findings to make a mosaic of some kind. Maybe on a table, or maybe just something simple like a tray. Any suggestions? 


Laura xXx
Read More

Thursday 21 June 2012

10 reasons why I want to buy a VW Campervan!

I get so excited about this, only to become absolutely crushed when the van of my dreams turns out to have some underlying fault, or gets snapped up by someone else!

My boyfriend and I want a VW camper.  Nothing too fancy, just a T25, water-cooled high top, that isn't going to fall apart the moment we buy it. Ok, so it's quite specific, but come on, there has to be the perfect one out there somewhere (local enough for us to view it first...).


So... here are the 10 reasons why I want to buy a campervan right now!

1. Making something that is uniquely ours - I am happy to buy a van with an interior that needs work. In fact I'd happily rip it out and start again! Just so we can have everything in it's place. 

2. Spending some quality time with my Mum and Dad - My Dad has offered to help with the above (I don't know how serious he was about that, but he'd better watch out because I'm taking him at his word!) I am envisioning sunny days with cups of tea talking over design plans. In reality I am sure it will be more sweating, saw dust in my eye and Dad having to swig a sneaky beer whilst wishing he had never offered help on such a hopeless task! My Mum is brilliant with crafty things like re-upholstering and anything involving fabric really! She will definitely be handy to help to make it pretty once the essentials are in. (She doesn't know this and hasn't volunteered yet, but I'm roping her in anyway!)

3. Learning new skills - Again, all of the above. Chris and I aren't the best with stuff like this, but my Dad is awesome, and he is such a perfectionist I'm sure it will all turn out better than I hoped, and we will learn how along the way.

4. Adventure - Getting out and about and doing unexpected things is what I am most looking forward to. I want to explore England and learn more about the country I come from. There are some pretty lovely places here after all!

5. Getting back to nature - I am excited to be in the countryside. To wake up to birds chirping and to fall asleep to the pitter patter of rain on the roof.

6. Having our own space - Chris and I are currently living with his parents. They are wonderful and we are so lucky to be able to live with them. But, we don't have enough money at the moment to buy our own house, and this would be like our own private get away, so we could have some 'us' time.

7. Spending more quality time with friends - Our friends have recently bought a campervan and I am dying to go away with them! We always have fun together, but at the moment it is just not often enough!

8. Having a cozy bed - When I was little we used to go away in our caravan. I remember my parent's bed being so cozy, I was always jealous. Now I want one of my own! (My parents actually met when camping when they were teenagers, they were part of a youth group in a camping club. I guess it must be in my blood!)

9. Time to read, drink tea, and be content - When I am at home I always feel guilty, like I should be out doing something. Hopefully once we are away I will be able to chill out without feeling I need to be doing anything other than the things I love.

10. ROAD TRIP! - I want to shout this before every adventure we go on. I will compose a playlist of songs relevant for each trip, and we will happily sing along the whole drive. Occasionally stopping to eat our home made (wheat free) sandwiches and pop out some Shloer!


Sounds like perfection to me! I hope it all comes true. We went to see a van on Saturday and I'm just waiting for my Dad's OK before we go ahead. Fingers crossed.

Anyone out there own a van and have any adventures to share?

Laura xXx
Read More

Monday 18 June 2012

Munchie Monday - Birthday scones in various guises


One of my best friends recently celebrated her birthday. We don't get to see her much as she lives and works in London.  However, we managed to get all four of us together for a rare afternoon catch up, so we decided to have a campervan picnic as the weather wasn't great.  Luckily my other friend has just purchased a rather lovely VW camper van, and we decided it was time for it to become 'The Party Bus' for the day.

We put up a banner and balloons and I made some scones.  I had super fun making these as I have recently invested in some new cookie cutters. These are THE BEST cookie cutters I have ever seen! (You can find some of them here) I tried out a Squirrel, and apple, a butterfly and  ... wait for it ... a dinosaur! Yes we had dinosaur scones!
I was really happy with the way they turned out, I thought they would probably loose their shape in the oven, but actually they both seemed to take on their own personalities (but still stayed dinosaurey).  I added eyes just so as there was no confusion.  I had a bit of a giggle when I cut them both out.  The raisins had stuck in a rather unfortunate place, but I will leave that to your imagination!
I know you aren't meant to play with your food. But I don't think that rule applies when you can make it look as though 2 scone dinosaurs have had a fight to the death!
We had a man shaped scone too, but he got too scared of the dinosaurs and split! (Get it??)

I love food that looks a bit different than you would expect it to. Have you had any fun food adventures recently?

Laura xXx


Read More

Saturday 16 June 2012

DIY - Pretty Pens

Here is a super easy, super cheap way of customizing your own pens! Keep reading to find out how.

 What you will need:

 • Biros
 • Patterned Paper or fabric
 • Scissors
 • Double sided tape 
 Directions 

Unscrew the biro so that you are just left with the inside part.
Cut a rectangle of fabric the length of the inner tube and approx 2cm wide. Cover the fabric with the double sided sticky tape then carefully wrap this around the inner tube by rolling it, making sure it is all securely stuck down.
Then simply screw it back together!
 I love having a jar full of these pens on my desk, it really brightens it up!
Yay for pretty pens! Have you got any simple ideas for personalising items? I'd love to hear them :)

Laura xXx
Read More

Thursday 14 June 2012

Bird Spotting

Sitting in the garden the other day, the sun was shining, and the wildlife was abundant! I even saw a sneaky fox! The birds were being particularly talkative, so I thought I would steal the chance to snap some photo's with my new awesome lens. I was amazed at how clear these photo's came out, the trees are massive so I really didn't think I'd be able to get as close up as I did.  

Anyway I managed to check off 3 birdies on my bird spotting list:

1. A Chaffinch - This fellow was particularly 'chirpy'. He was adorable.  I don't know anything about birds but I managed to guess that he was a chaffinch. Hurrah for me! Maybe it is a hidden talent. David Attenborough eat your heart out.
-- Here he is again, making a racket.
2. The rare lesser-spotted Pigeon! Ok, so its just a pigeon, but a cool photo none the less.
3. A Magpie. This one is looking particularly mysterious as we can't see his eyes. I think he is incognito  as he is about to steal something shiny.

Maybe not the most difficult of birds to find, but I think it is a good start. I'm getting quite into this now. Maybe I will buy a bird watching book and some binoculars and see how many I can get photos of!

Do any of you have any cool wildlife in you gardens, or like bird watching?

Laura xXx

Read More

Monday 11 June 2012

Munchie Monday - Raw Food Mango Ice Lollies!

Probably not the best day to be posting this, the weather has been disgusting here today. But we can all look forward to a little bit of sun in the not too distant future (hopefully). So here it goes...

Who ever said that an ice lolly couldn't be healthy? Not me, thats for sure!

For christmas my boyfriend bought me a fantastic book called 'Ani's Raw Food Desserts' by Ani Phyo. Check out her website HERE and find the book HERE. Basically it's a book of biscuits, desserts and cakes that are all good for you, as they are made with raw fruit, nuts and seeds. The easiest of them all is a mango sorbet. The only ingredients are frozen mango, agave syrup and filtered water. I thought I would try it out in ice lolly form, and they were pretty delicious even if I do say so myself!

If you want to try it out you will need:

2 cups chopped frozen mangoes
1 cup filtered water
1/3 cup agave syrup

Then just blend them all together!

Here are some photos of the creative/messy process:
You should taste it at this point, it is yummy!
Yum yum! If you like the look of these then I would highly recommend buying 'Ani's Raw Food Desserts'. It is FAB!

You can see some of her other books below:


Laura xXx
Read More

Saturday 9 June 2012

Experimenting with Nail Art - DIY Leopard Print

I've never really experimented with nail art. Don't get me wrong, I love painting my nails pretty colours! But with nail art I have always thought that whilst I may be able to make my left hand look pretty cool, my right hand was going to look a total mess, no matter how much time I spent on it.

Recently, however, I've been seeing more and more nail art on instagram, twitter, pinterest and on some of my favourite blogs. Well, if they can do it why can't I!?  I spotted a models own nail art pen in Boots and thought it was the perfect way to get started!

First I thought I would just try a different pattern on each nail and see what I liked best. Unfortunately I probably couldn't get away with wearing this to work, so I picked a day when my nail varnish was due to come off so I could go as crazy as I liked, then whip it off quickly before work the next day.
So... As you can see I decided to go for vertical stripes on my little nail, then spots (which gradually turned into leopard print), then swirls, then diagonal stripes, and finally spots across the top of my nail on my thumb.  Well, I quickly realised that the stripes and swirls were not going to be easy to replicate on my right hand, but that was ok, I liked the spots/leopard print best anyway!

Now to see if I could do it without any smudges or mistakes!
Success! I think these look pretty darn good.  And because of the rugged nature of leopard print, it was pretty easy to do to!

After I finished these I put a quick coat of clear nail varnish on them. Perhaps I should have waited a little longer as they did smudge a little, although not too noticeably. Ideally I think next time I would let it dry over night before painting the clear coat, just to be sure it would be extra perfect.

I'm sure I'll try this again soon, although maybe I'll wait for a weekend so I can actually show them off!

Below are the varnishes I used to make this design.  Models Own 3 in 1 Base coat/Top coat and Gloss, Models own Nail Art Pen in black and Rimmel London  60 Seconds Instyle Coral.

Let me know if you try this design out and if it works for you!

Laura xXx
Read More

Tuesday 5 June 2012

DIY Tutorial - IPhone Stand

I don't know about you but I like to watch TV programmes on my Iphone when I am feeling bored (usually in my lunch breaks at work), but I always have trouble finding something to prop it up against. If you are anything like me then you have probably resorted to using a cup or a book, but not any more! Now, all of your IPhone propping problems can be solved with my handy portable DIY stand!

To make this essential piece of equipment you will need:

  • Thick cardboard (I used the back of an old note pad)
  • Ruler
  • Craft Knife
  • Fabric (at least 27cm by 30cm)
  • Pins
  • Large Needle/ Darning Needle and thick thread (Or wool)
  • Scissors
  • A Sewing Machine (optional)

Step 1

Using your craft knife cut 3 rectangles out of the card, as shown below (you will probably want to measure this all up properly first). Two pieces measuring 11.5cm by 6cm, one measuring 11.5cm by 5cm and one measuring 11.5cm by 9cm. The largest piece will form the base .

Step 2

Lay your piece of fabric pattern up, then lay your 4 pieces of card in a line (just touching each other) nearly at the top of the fabric, with the biggest and smallest pieces at each end and the medium pieces in the middle (Take a look after step 7 to get a better idea why we are doing this). Fold the fabric over as below, then draw around the outline of all 4 pieces of card. We are going to use this outline to make a pocket.

Step 3

Pin around the outline we have just drawn. I chose to leave the cardboard in place to give me more of a guide to follow and make sure the card will fit back in afterwards. Leave one end open so that we can turn the fabric back round the right way and insert the cardboard.

Step 4

Sew it up! Don't forget to leave one end open.

Step 5

Turn the pocket out, so that the fabric is now facing patterned side out. Now re-insert just the largest piece of cardboard so that it sits at the bottom of the pocket.

Step 6

We are going to make a hinge, so you will need to sew in backstitch (I used wool) along where the first piece of cardboard ends. You will want to keep it as close to the edge of the cardboard as possible. Once this is done, insert one of the medium sized pieces and repeat the process, do the same with the next medium sized piece, then insert the smallest piece.

Step 7

To finish off the end I still used a backstitch but made sure the ends were tucked in nice and neatly, then kept as close to the edge as I could.
Hopefully it will look a bit like the above picture when you have finished! You should be able to fold it up like this too. It flatpacks!
I hope you liked this tutorial, and that you understood it all. Please let me know if you have any questions. But if not, happy Iphone watching!

Oh, and let me know if you decide to make one, I'd love to see photo's and maybe even feature them on a post at a later date. Feel free to post the tutorial up on your site too, as long as you include a link back to this one :)

Laura xXx
Read More
Related Posts Plugin for WordPress, Blogger...
Powered by Blogger.

© 2011 Wrapped Up In Rainbows, AllRightsReserved.

Designed by ScreenWritersArena